Hướng dẫn cách chuyển đổi qua lại trong 1 Android app nhiều Activity và cách gửi dữ liệu giữa các Activity.

Chuyển đổi Activity kèm theo dữ liệu
Việc chuyển đổi Activity mà không gửi kèm dữ liệu, chỉ cần tạo 1 đối tượng Intent sử dụng constructor dưới đây:
public Intent(Context packageContext, Class<?> cls)
Context packageContext: Activity hiện tại.Class<?> cls: Activity muốn chuyển hướng đến.
Ví dụ muốn chuyển hướng từ MainActivity sang AboutAcitivity cần tạo Intent như sau:
Intent intent = new Intent(MainActivity.this, AboutActivity.class);
Hoặc:
Intent intent = new Intent(this, AboutActivity.class);
Cuối cùng để thực hiện chuyển Activity, sử dụng phương thức của lớp Context.
public void startActivity(Intent intent)
Ví dụ có 1 button trong MainActivity khi nhấn button này thì thực hiện chuyển sang AboutActivity như sau:
package com.nguyennghia.eitguide.activitydemo;
import android.content.Intent;
import android.graphics.Color;
import android.support.v7.app.AppCompatActivity;
import android.os.Bundle;
import android.view.Gravity;
import android.view.View;
import android.view.ViewGroup;
import android.widget.Button;
import android.widget.FrameLayout;

public class MainActivity extends AppCompatActivity {
    @Override
    protected void onCreate(Bundle savedInstanceState) {
        super.onCreate(savedInstanceState);

        FrameLayout frameLayout = new FrameLayout(this);
        frameLayout.setBackgroundColor(Color.parseColor("#ecf0f1"));

        Button btnNavi = new Button(this);
        btnNavi.setText("Navigate To About Activity");

        FrameLayout.LayoutParams params = new FrameLayout.LayoutParams(ViewGroup.LayoutParams.WRAP_CONTENT, ViewGroup.LayoutParams.WRAP_CONTENT);
        params.gravity = Gravity.CENTER;
        frameLayout.addView(btnNavi, params);
        setContentView(frameLayout);

        // Navigate to AboutActivity
        btnNavi.setOnClickListener(new View.OnClickListener() {
            @Override
            public void onClick(View v) {
                Intent intent = new Intent(MainActivity.this, AboutActivity.class);
                startActivity(intent);
            }
        });
    }
}
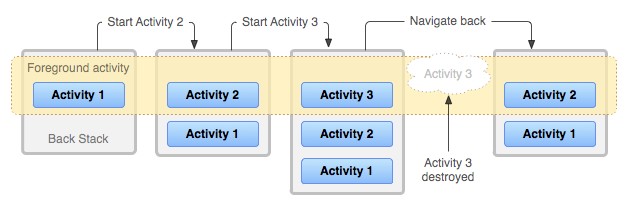
Khi chuyển sang AboutActivity thì MainActivity được đẩy xuống dưới Back Stack và AboutActivity sẽ ở trên đầu của Back Stack. Vì vậy khi nhấn trở lại từ AboutActivity thì MainActivity được đẩy lên và onResume() của MainActivity được gọi.
Lưu ý: Mọi Activity tạo ra phải được khai báo trong file AndroidManifest.xml, nếu không khai báo mà vẫn sử dụng Activity này thì hệ thống sẽ ném ra ngoại lệ, điều này cũng được áp dụng khi sử dụng Service trong Android.
Dưới đây là 2 Activity được khai báo trong AndroidManifest.xml
<?xml version="1.0" encoding="utf-8"?>
<manifest xmlns:android="http://schemas.android.com/apk/res/android"
    package="com.nguyennghia.eitguide.activitydemo">
    <application
        android:allowBackup="true"
        android:icon="@mipmap/ic_launcher"
        android:label="@string/app_name"
        android:supportsRtl="true"
        android:theme="@style/AppTheme">
        <activity android:name=".MainActivity">
            <intent-filter>
                <action android:name="android.intent.action.MAIN" />
                <category android:name="android.intent.category.LAUNCHER" />
            </intent-filter>
        </activity>
        <activity android:name=".AboutActivity"></activity>
    </application>
</manifest>
Tuy nhiên, khi tạo Activity thông qua Android Studio thì 2 file sau sẽ được tạo:
- 1 file có phần mở rộng .java.
- 1 file .xml định nghĩa UI cho Activity.
- Tự động khai báo Activity vừa tạo trong AndroidManifest.xml.
Để làm như vậy, nhấn chuột phải vào bên vùng quản lý file của project. Chọn Activity → Empty Activity, sau đó nhập tên class Activity để hệ thống tự sinh ra các file .xml và .java cho Activity và khai báo tự động trong AndroidManifest.xml
Chuyển đổi Activity kèm theo dữ liệu
Giả sử có 2 Activity:
- Activity A gồm 1
TextViewvà 1Button. - Activity B gồm 1
TextView.
Khi nhấn vào button thì lấy text ở TextView tại Activity A và truyền qua Activity B. Activity B sẽ lấy giá trị mà Activity A truyền sang và gán vào TextView của Activity B.
Chỉ có thể truyền được String qua nhưng còn các đối tượng khác phức tạp hơn thì sao? Ví dụ như 1 array, 1 object.
Việc chuyển đổi Activity có kèm theo dữ liệu cũng tương tự với trường hợp chuyển Activity không kèm theo dữ liệu nhưng có 1 số điểm khác sau đây:
- Khi tạo
Intentphải đặt các dữ liệu kèm theo qua đối tượngintentnày, sử dụng các phương thức có tiền tố làputcủa đối tượngintentđể gửi dữ liệu, mỗi dữ liệu đặt vào sẽ có 1 key đi kèm. Intentsẽ đặt bất cứ kiểu dữ liệu nào như các kiểu dữ liệuchar,boolean,int,float,long,Stringhay kiểu mảngboolean[],char[],int[], kiểu dữ liệu object, tuy nhiên những kiểu dữ liệu này phảiimplementinterface Parcelablehoặcinterface Serializable.
Gửi dữ liệu đi riêng lẻ
Intent intent = new Intent(MainActivity.this, AboutActivity.class);
intent.putExtra("int_key", 4);
intent.putExtra("char_key", 'r');
intent.putExtra("boolean_key", true);
intent.putExtra("long_key", 323L);
intent.putExtra("float_key", 3.2f);
intent.putExtra("string_key", "Chuyen Activity trong Android");
intent.putExtra("double", 32D);
intent.putExtra("int_array_key", new int[]{1, 2, 9});
intent.putExtra("boolean_array_key", new boolean[]{true, false, true, true});
intent.putExtra("char_array_Key", new char[] {'e', 'i', 't', 'g', 'u', 'i', 'd', 'e'});
intent.putExtra("rect_key", new Rect(0,0, 200, 200));

startActivity(intent);
Gửi dữ liệu đi sử dụng Bundle
Thay vì sử dụng bằng cách đặt dữ liệu vào intent thì sử dụng 1 đối tượng gọi là Bundle, đặt các dữ liệu vào đối tượng này và sử dụng phương thức putExtras() để đặt hết vào intent.
Bundle bundle = new Bundle();
bundle.putChar("char", 'e');
bundle.putInt("int", 3);
bundle.putString("string", "wwww.eitguide.com");
bundle.putFloat("float", 5.2f);
bundle.putDouble("double", 843D);
bundle.putLong("long", 55343L);
bundle.putParcelable("parcelable", new Rect(0, 0, 300, 300));

intent.putExtras(bundle);
startActivity(intent);
Sau khi đặt dữ liệu xong thì gọi phương thức startActivity() để thực hiện chuyển trang và truyền dữ liệu.
Nhận dữ liệu
Sau khi startActivity(), ở Activity B có được dữ liệu mà Activity A gửi đến, để lấy được dữ liệu làm như sau:
- Lấy ra đối tượng
Intentmà Activity A gửi qua bằng phương thứcgetIntent(). - Từ đối tượng
intentcó được từgetIntent(), lấy những dữ liệu trong đối tượng này bằng phương thứcgetXExtra()(với X là kiểu dữ liệu muốn lấy).
// Get data from MainActivity
int intValue = intent.getIntExtra("int_key", 0);
char charValue = intent.getCharExtra("char_key", 'a');
float floatValue = intent.getFloatExtra("float_key", 0f);
boolean booleanValue = intent.getBooleanExtra("boolean_key", false);
String stringValue = intent.getStringExtra("string_key");
int[] intArrayValue = intent.getIntArrayExtra("int_array_key");
char[] charArrayValue = intent.getCharArrayExtra("char_array_key");
Rect rect = intent.getParcelableExtra("rect_key");
Những phương thức lấy dữ liệu thường có hai đối số là:
- Đối số thứ nhất là key đã đặt bên Activity gọi
startActivity() - Đối số thứ hai là giá trị mặc định nếu key không tồn tại.
Nếu gửi dữ liệu bằng Bundle thì làm như sau:
Bundle bundle = intent.getExtras();
char charValue = bundle.getChar("char");
int intValue = bundle.getInt("int");
String stringValue = bundle.getString("string");
float floatValue =  bundle.getFloat("float");
double doubleValue = bundle.getDouble("double");
long longValue = bundle.getLong("long");
Rect rect = bundle.getParcelable("parcelable");
Android
Tổng hợp các bài viết Android hữu ích
Nguoon:https://www.stdio.vn/android/chuyen-doi-activity-trong-android-Q17fda


